

Xmpl tool is a free and Open source Bash script, developed by the Xmpl project community. It runs on most Linux/Unix distributions with a Bash console.
These 3 packages are required to run Xmpl tool:
- curl
- jq
- git
For no install working mode, it is enough to have these packages installed and the Xmpl tool downloaded on the local machine.
In this mode, an active Internet connection is required, because all the results are being fetched directly from the GitHub repository.
For working with private repositories, a valid GitHub account is required.
Before using Xmpl tool with private repositories, please configure git, as described on GitHub help pages:
https://help.github.com/en/articles/setting-your-username-in-git
https://help.github.com/en/articles/setting-your-commit-email-address
The simplest way of downloading the latest version of Xmpl tool from GitHub is to use git:
$: git clone https://github.com/xmpl-tool/xmpl-script.git
The downloaded Xmpl tool is located in the xmpl-script directory under the name xmpl.sh.
Downloaded script should have executable file permissions.
For automated installation of Xmpl tool on a local machine, run the script file with the --install or -I flag in the Bash console, with superuser privileges.
$: sudo bash xmpl.sh -I
After running the Xmpl tool automated installation, you have to confirm the installation.
Do you really want to install xmpl-tool 1.0.9 on your local system? [Y/n]
After confirmation, all required dependencies will be installed, and the Xmpl tool will be set up for working in online mode.
If everything worked Xmpl tool will display this message:
xmpl-tool 1.0.9 installed seccessfully!
To enable offline working mode, and working mode with local repositories, it is necessary to proceed with the installation or run it again later.
After installing the Xmpl tool on the local machine, the message will be displayed for the continuing installation of a local repository.
Do you want to download examples repositiry and use it locally? [Y/n]
After confirming this step, the Xmpl main repository will be installed on the local machine, with the local pseudonym main, as described in Manual installation with local repositories (1.1.4.2).
To work with private repositories, it is necessary to have a GitHub account.
Following the installation, the Xmpl tool will offer an option to use private repositories:
Do you want to crate a private repository on GitHub, and share your examples with the community? [Y/n]
After confirming this step, the user will be asked to enter a GitHub username and the desired repository alias for the new local repository.
If the user did not fork the Xmpl main repository on their GitHub profile, the Xmpl tool will request authorization for forking Xmpl main repository to their GitHub profile.
At the end of the installation, a forked repository from the GitHub user account will be downloaded to the local machine.
For the manual installation of the Xmpl tool on the local machine, you will have to copy the xmpl.sh script, to local path /usr/local/bin/ with filename xmpl:
$: sudo cp xmpl.sh /usr/local/bin/xmpl
The Xmpl tool is designed to work as a sourced script in the user environment where the script is running. This option is necessary to enable all functionalities.
Some Xmpl examples may not work if the Xmpl tool is not running as a sourced script.
To manually install Xmpl tool as a sourced script, it is necessary to add an alias for Xmpl tool in ~/.bashrc file:
To execute the last used example with the sudo command, it is necessary to add a line in the /etc/sudoers file that allows the use of specific Xmpl variables with the sudo command:
In order to work in shell interpreters other than Bash, you will have to make the appropriate configuration in your interpreter’s configuration files.
To manually enable working with local repositories, create a user repo directory:
$: mkdir ~/.xmpl/repos/xmpl-tool
(where the GitHub username is xmpl-tool)
Clone the GitHub repo into the newly created directory:
$: git clone https://github.com/xmpl-tool/xmpl-repo ~/.xmpl/repos/xmpl-tool/xmpl-repo
This method can be used to create custom repositories, changing the directory name and the GitHub address respectively.
To enable the repository in the Xmpl tool, you need to create a repo.conf file in the ~/.xmpl directory. The file should contain the repository pseudonym on the local system (main) with the GitHub username and GitHub repository name written in the format: github_user/github_repo
Example of repo.conf file:
To complete the installation, you need to create an xmpl.conf file with the XMPL_DEFAULT_REPO variable in the ~/.xmpl directory, which defines the current local pseudonym of the local repository (main).
Example of xmpl.conf file:
Updating an installation of Xmpl tool is done with the option --update or -U. The command needs to be executed with superuser privileges.
$: sudo xmpl –U
After running the command with superuser privileges, an update confirmation request will be printed:
This will update xmpl-tool to latest version! Are you sure? [Y/n]
Once the request is confirmed and the tool is successfully updated, a confirmation message will be printed:
xmpl-tool is updated to latest version (1.0.9)!
To uninstall Xmpl tool, use the option --uninstall or -D with superuser privileges.
$: sudo xmpl –D
After issuing the command, a confirmation message appears.
This will remove xmpl-tool from your system. Are you sure? [Y/n]
After confirming, you will be prompted to delete all installed local repositories.
Do you want to remove all your local repositories? [Y/n]
After confirmation, Xmpl tool and local repositories will be deleted from the local machine.
Simply run xmpl command without arguments to list all available packages in a repository.
$: xmpl
This will list all available packages in the selected repository, and the user will be able to choose one of the listed packages
1 apt-cache  The apt-cache command can display much of the information stored in APT's internal database
2 apt-get  Command-line tool for handling packages on Debian based distributions
3 cal  The cal utility displays a simple calendar in traditional format
4 cd  The cd command is used to change the current directory
5 curl  Tool for transferring data from or to a server, using various protocols
6 date  Print or set the system date and time
7 dig  Dig (domain information groper) is a tool that is used for querying DNS servers for various DNS records, making it very useful for troubleshooting DNS problems.
8 dmesg  Command which will show Kernel messages contain valuable information about device drivers
9 du  Display disk usage statistics
10 echo  Display a line of text
11 eject  Eject  allows removable media (typically a CD-ROM, floppy disk, tape, or JAZ or ZIP disk) to be ejected under software control.
12 ffmpeg  FFmpeg is a free software project that produces libraries and programs for handling multimedia data.
13 ffplay  FFplay is a very simple and portable media player using the FFmpeg libraries and the SDL library. It is mostly used as a testbed for the various FFmpeg APIs.
14 find  Find command used to search and locate list of files and directories based on conditions you specify
15 hostname  This command can get or set the host name or the NIS domain name for local computer.
16 id  Display Complete User Information
17 ifconfig  Configure a network interface.
18 ip  Show / manipulate network routing, devices, policy routing and tunnels
19 last  Displays a list of all users logged in (and out) since /var/log/wtmp was created.
20 lshw  Small tool to extract detailed information on the hardware configuration of the machine
21 ls  List directory contents
22 man  system's manual pager, an interface to the on-line reference manuals
23 ngrep  Command line network packet analyzer
24 nmap  Network exploration tool and security / port scanner
25 openssl  Open source implementation of the SSL protocol.
26 pacman  Pacman is a package management utility that tracks installed packages on a Arch Linux distributions
27 ping  Ping is a computer network administration software utility used to test the reachability of a host on an network.
28 pwd  Print the full pathname of the current/working directory.
29 scp  Copies files between hosts on a network
30 sed  Stream editor for filtering and transforming text
31 tar  Tar is a computer software utility for collecting many files into one archive file
32 time  Run programs and summarize system resource usage
33 type  Describe a command, for each name, indicate how it would be interpreted if used as a command name.
34 uname  Prints the name, version and other details about the current machine and the operating system running on it.
35 uptime  Tell how long the system has been running.
36 wget  Free utility for non-interactive download of files from the Web
37 which  Returns the pathnames of the files (or links) which would be executed in the current environment
38 whoami  Print the user name associated with the current effective user ID
39 w  Displays information about the users currently on the machine, and their processes.
40 youtube-dl  Small command-line program to download videos from YouTube.com and a few more sites
41 zip  Package and compress files to *.zip archive
Please select package:
To show available examples, the user has to select a package by name or by number.
tar
1 Create a new bunzip compressed tar archive
2 Create a new gunzip compressed tar archive
3 Create a new tar archive
4 Extract existing bunzip compressed tar archive
5 Extract existing gunzip compressed tar archive
6 Extract existing tar archive
7 View an existing tar archive
Please select example number:
At the end, if there is more than one example, the user will have to choose the number of the example which will finally be displayed.
4
tar: Extract existing bunzip compressed tar archive
tar xvfj {:archive name:}
Searching for examples is one of Xmpl tool’s main functionalities, so it is set as the default operation.
For fast searching through all examples, search terms should follow the Xmpl command:
$: xmpl replace text
If there is more than one example matching the searched terms, all found examples will be shown, and the user will have to choose an example to use and display.
1 sed Replace specific word in text file and save changes to file
2 sed Replace specific word in text file
Please select example number:
2
sed: Replace specific word in text file
sed 's/{:search:}/{:replace:}/g' {:file:}
The same thing can be done with the option --search or –s.
$: xmpl replace text save
sed: Replace specific word in text file and save changes to file
sed -i 's/{:search:}/{:replace:}/g' {:file:}
If there is only one result, it will directly be used and printed into the console.
When there are no results found, this message will be displayed:
No results found!
For filtering Xmpl examples by package name, use the --package or -p option followed by the name of the package for which you want to filter examples.
$: xmpl -p wget
1 Download a file from a webserver and save to hard drive
2 Download entire website
3 Download file into specific directory
Please select example number:
1
wget: Download a file from a webserver and save to hard drive
wget {:remote file:}
If the filter is used in search, the search will only take place over the examples under the filtered package name.
xmpl download file -p wget
1 Download a file from a webserver and save to hard drive
2 Download file into specific directory
Please select example number:
1
wget: Download a file from a webserver and save to hard drive
wget {:remote file:}
To turn on comments in Xmpl examples, use option --comments or -c.
If comments exist in an Xmpl example content, they will be displayed when using and printing the final result.
$: xmpl debian install new package -c
apt-get: Install or upgrade specific packages on Debian based distributions
#may need root permissions
apt-get install {::packages::}
Raw mode allows you to view an example with its headers and print the entire content of the selected example file.
To display raw examples it is necessary to use --raw or –C option.
$: xmpl debian install new package -C
apt-get: Install or upgrade specific packages on Debian based distributions
#install or upgrade specific packages on debian based distributions
#apt install new software version ubuntu mint package manager
#may need root permissions
apt-get install {::packages::}
With the --online or –o option, Xmpl tool is forced to use examples from the GitHub repository instead of using local examples.
This option can only be used on the source repository.
$: xmpl -o
Online mode!
1 apt-cache
2 apt-get
3 cal
4 cd
5 curl
6 date
7 dig
8 dmesg
9 du
10 echo
11 eject
12 ffmpeg
13 ffplay
14 find
15 hostname
16 id
17 ifconfig
18 ip
19 last
20 lshw
21 ls
22 man
23 openssl
24 pacman
25 ping
26 pwd
27 scp
28 sed
29 tar
30 time
Please select package:
3
cal: Show this month calendar
cal
Fetching the package descriptions from the GitHub repository takes some time, so in this mode this option is disabled by default.
As this option is default for non-installed usage, it is not available while running in this mode.
Online mode with descriptions forces Xmpl tool to use examples from the GitHub repository, and includes package descriptions when Listing all packages (2.1).
This option can be used on any source repository, and it can be activated by using --full-online or -O option.
$: xmpl -O
Online mode!
1 apt-cache  The apt-cache command can display much of the information stored in APT's internal database
2 apt-get  Command-line tool for handling packages on Debian based distributions
3 cal  The cal utility displays a simple calendar in traditional format
4 cd  The cd command is used to change the current directory
5 curl  Tool for transferring data from or to a server, using various protocols
6 date  Print or set the system date and time
7 dig  Dig (domain information groper) is a tool that is used for querying DNS servers for various DNS records, making it very useful for troubleshooting DNS problems.
8 dmesg  Command which will show Kernel messages contain valuable information about device drivers
9 du  Display disk usage statistics
10 echo  Display a line of text
11 eject  Eject  allows removable media (typically a CD-ROM, floppy disk, tape, or JAZ or ZIP disk) to be ejected under software control.
12 ffmpeg  FFmpeg is a free software project that produces libraries and programs for handling multimedia data.
13 ffplay  FFplay is a very simple and portable media player using the FFmpeg libraries and the SDL library. It is mostly used as a testbed for the various FFmpeg APIs.
14 find  Find command used to search and locate list of files and directories based on conditions you specify
15 hostname  This command can get or set the host name or the NIS domain name for local computer.
16 id  Display Complete User Information
17 ifconfig  Configure a network interface.
18 ip  Show / manipulate network routing, devices, policy routing and tunnels
19 last  Displays a list of all users logged in (and out) since /var/log/wtmp was created.
20 lshw  Small tool to extract detailed information on the hardware configuration of the machine
21 ls  List directory contents
22 man  system's manual pager, an interface to the on-line reference manuals
23 openssl  Open source implementation of the SSL protocol.
24 pacman  Pacman is a package management utility that tracks installed packages on a Arch Linux distributions
25 ping  Ping is a computer network administration software utility used to test the reachability of a host on an network.
26 pwd  Print the full pathname of the current/working directory.
27 scp  Copies files between hosts on a network
28 sed  Stream editor for filtering and transforming text
29 tar  Tar is a computer software utility for collecting many files into one archive file
30 time  Run programs and summarize system resource usage

Please select package:
date
date: Show current system date and time
date
By running Xmpl tool with the --input or -i option, the user will be prompted to interactively enter custom values, if the example contains appropriate input variables.
Example: Ping host with input option
$: xmpl ping host -i
In this example, there is only one result for the terms ping and host.
After executing this command, the user will be prompted to enter the variable remote host.
In this example we will enter github.com as the value for that variable, and the final result will be a complete command with the forwarded variable values:
ping: Test the reachability of a host on network
ping {:remote host:} -c 4
remote host:
github.com
ping github.com -c 4
If the same command is invoked, Xmpl tool will automatically suggest the last used entries for this selection.
The same can be achieved by forwarding the variable values directly after the option --input or -i, where the values for all variables should be set. Values for different variable input are separated with a whitespace character.
In this example, the entry www.github.com will be set as the value for the input variable remote host:
$: xmpl ping host -i www.github.com
ping: Test the reachability of a host on network
ping {:remote host:} -c 4
remote host:
www.github.com
ping www.github.com -c 4
Outputs streams in the user input mode:
The tool uses the stdErr and stdOut output streams. All messages except the final result are printed on the stdErr stream. Only the final result which the Xmpl tool actually returns, goes to the stdOut stream.
This makes it possible to retrieve the prepared result only, and to redirect it to a local file.
Example: Redirecting result to a file named local.file
$: xmpl ping -i > local.file
1 nmap Ping scans the network, listing machines that respond to ping
2 ping Flood ping
3 ping Test the reachability of a host on network
Please select example number:
3
ping: Test the reachability of a host on network
ping {:remote host:} -c 4
remote host:
www.github.com
The final result is not listed in the console, but was added to the file local.file. This can be checked by printing the file with cat command:
$: cat local.file
ping www.github.com -c 4
In user input mode the last whitespace is remove if present in the entry. This is the result of the Bash implementation of the autocomplete function. After selecting a location or file with autocomplete, the whitespace remains at the end of the entry. Therefore, if the user deliberately wishes to pass the whitespace at the end, the entry must be entered in quotation marks: "entry " or 'entry '
Use the --execute or -x option to execute examples.
Example: Executing ping host example
$: xmpl ping host -x
ping: Test the reachability of a host on network
ping {:remote host:} -c 4
remote host:
By using the --execute or -x options, as well as in user input mode (2.8), the tool will prompt for the value of the "remote host" variable. After entering the address or hostname of the remote computer, selected command with the forwarded arguments will be executed:
github.com
ping github.com -c 4
PING github.com (140.82.118.3) 56(84) bytes of data.
64 bytes from lb-140-82-118-3-ams.github.com (140.82.118.3): icmp_seq=1 ttl=52 time=50.5 ms
64 bytes from lb-140-82-118-3-ams.github.com (140.82.118.3): icmp_seq=2 ttl=52 time=277 ms
64 bytes from lb-140-82-118-3-ams.github.com (140.82.118.3): icmp_seq=3 ttl=52 time=95.2 ms
64 bytes from lb-140-82-118-3-ams.github.com (140.82.118.3): icmp_seq=4 ttl=52 time=220 ms

--- github.com ping statistics ---
4 packets transmitted, 4 received, 0% packet loss, time 3003ms
rtt min/avg/max/mdev = 50.563/160.816/277.117/91.548 ms
EXECUTED
In user input mode (2.8.), it is possible to forward arguments with which we want to execute the selected example. This can be done by typing values directly after the option --execute or -x, or when the user is being prompted to enter the variable values.
$: xmpl ping host -x www.github.com
ping: Test the reachability of a host on network
ping {:remote host:} -c 4
remote host:
www.github.com
ping www.github.com -c 4
PING github.com (140.82.118.3) 56(84) bytes of data.
64 bytes from lb-140-82-118-3-ams.github.com (140.82.118.3): icmp_seq=1 ttl=52 time=55.5 ms
64 bytes from lb-140-82-118-3-ams.github.com (140.82.118.3): icmp_seq=2 ttl=52 time=180 ms
64 bytes from lb-140-82-118-3-ams.github.com (140.82.118.3): icmp_seq=3 ttl=52 time=202 ms
64 bytes from lb-140-82-118-3-ams.github.com (140.82.118.3): icmp_seq=4 ttl=52 time=226 ms

--- www.github.com ping statistics ---
4 packets transmitted, 4 received, 0% packet loss, time 3003ms
rtt min/avg/max/mdev = 55.538/166.233/226.084/65.924 ms
EXECUTED
Outputs streams in the execute mode:
When executing an example, the Xmpl tool will return the output of the executed command as the final result. The result could be forwarded to the next command with the pipe (|) symbol or stored in a local file.
$: xmpl list hardware -x | grep SATA
lshw: List all hardware on machine
lshw
WARNING: you should run this program as super-user.
                description: SATA controller
                product: 88SE9172 SATA 6Gb/s Controller
             description: SATA controller
             product: 7 Series/C210 Series Chipset Family 6-port SATA Controller [AHCI mode]
WARNING: output may be incomplete or inaccurate, you should run this program as super-user.
EXECUTED
The output of the lshw command is passed to the grep command that prints only lines that mention the word SATA.
Output can also be written to a file:
$: xmpl ip addresses -x > test.file
ip: Display all network interfaces and ip addresses
ip addr show
EXECUTED
The final result is not printed on the console but redirected to the file test.file, which can be checked by printing the file with the cat command:
$: cat test.file
1: lo: <LOOPBACK,UP,LOWER_UP> mtu 65536 qdisc noqueue state UNKNOWN group default qlen 1000
    link/loopback 00:00:00:00:00:00 brd 00:00:00:00:00:00
    inet 127.0.0.1/8 scope host lo
       valid_lft forever preferred_lft forever
    inet6 ::1/128 scope host
       valid_lft forever preferred_lft forever
2: enp6s0: <NO-CARRIER,BROADCAST,MULTICAST,UP> mtu 1500 qdisc pfifo_fast state DOWN group default qlen 1000
    link/ether 90:2b:34:5a:d0:91 brd ff:ff:ff:ff:ff:ff
14: enp0s29u1u6: <BROADCAST,MULTICAST,UP,LOWER_UP> mtu 1500 qdisc pfifo_fast state UNKNOWN group default qlen 1000
    link/ether 52:88:a0:9a:3c:f6 brd ff:ff:ff:ff:ff:ff
    inet 192.168.42.17/24 brd 192.168.42.255 scope global dynamic enp0s29u1u6
       valid_lft 3531sec preferred_lft 3531sec
    inet6 fe80::c43f:e384:d49d:d475/64 scope link
       valid_lft forever preferred_lft forever
In addition to outputting the executed command to the stdOut output stream, the alternative output stream stdOut2 prints the exact commands that are executed.
$: xmpl ping host -x www.github.io 3> alternate.out
ping: Test the reachability of a host on network
ping {:remote host:} -c 4
remote host:
www.github.io
ping www.github.io -c 4
PING www.github.io (185.199.109.153) 56(84) bytes of data.
64 bytes from 185.199.109.153: icmp_seq=1 ttl=54 time=205 ms
64 bytes from 185.199.109.153: icmp_seq=2 ttl=54 time=46.2 ms
64 bytes from 185.199.109.153: icmp_seq=3 ttl=54 time=46.2 ms
64 bytes from 185.199.109.153: icmp_seq=4 ttl=54 time=46.0 ms

--- www.github.io ping statistics ---
4 packets transmitted, 4 received, 0% packet loss, time 3003ms
rtt min/avg/max/mdev = 46.026/85.909/205.142/68.839 ms
EXECUTED
The result can be checked with the cat command:
$: cat alternate.out
ping www.github.io -c 4
Execute mode (2.9.) is prioritized over user input mode (2.8.). If both are invoked simultaneously, the tool will use execute mode (2.9.).
If the tool is properly installed and used as a sourced script, it is possible to retrieve and view the last used example by using the --last or -l option.
$: xmpl -l
ping: Test the reachability of a host on network
ping {:remote host:} -c 4
This option is available in the same shell session if the tool is fully installed.
To execute the last fetched command, use the --execute-last or -X option. This option behaves like execute mode (2.9), but executes only the last used example.
$: xmpl -X
ping: Test the reachability of a host on network
ping {:remote host:} -c 4
remote host:
1.1.1.1
ping 1.1.1.1 -c 4
PING 1.1.1.1 (1.1.1.1) 56(84) bytes of data.
64 bytes from 1.1.1.1: icmp_seq=1 ttl=58 time=21.8 ms
64 bytes from 1.1.1.1: icmp_seq=2 ttl=58 time=29.9 ms
64 bytes from 1.1.1.1: icmp_seq=3 ttl=58 time=25.8 ms
64 bytes from 1.1.1.1: icmp_seq=4 ttl=58 time=29.0 ms

--- 1.1.1.1 ping statistics ---
4 packets transmitted, 4 received, 0% packet loss, time 3003ms
rtt min/avg/max/mdev = 21.859/26.674/29.989/3.182 ms
EXECUTED
Like in example execution mode (2.9), it is possible to forward the parameters after the options --execute-last or -X. It is also possible to input these values later through the Xmpl tool when executing the examples.
Execute mode (2.9.) is prioritized over user input mode (2.8.). If both are invoked simultaneously, the tool will use execute mode (2.9.).
Editing and adding new examples is only possible through private repositories. To add a private repository you will have to run the tool with the option --new-repo or –n.
A GitHub account is necessary for this procedure.
$: xmpl -n
After starting the command, the tool will prompt the user to enter their GitHub username and immediately request a local pseudonym entry for a new local repository. If there is no Xmpl repository on the user's GitHub profile, it will be forked from the main Xmpl repository and then downloaded to the local machine.
New repository from GitHub source 'xmpl-tool/xmpl-repo'
Enter GitHub username:
xmpltest
Enter local repository alias:
dev
If a user doesn't have a private copy of the Xmpl main repository on their GitHub account, the Xmpl tool will ask them to authorize forking the xmpl-main repository.
Enter host password for user 'xmpltest': ********
After the user is authorized with their GitHub password, the Xmpl tool will fork and download the repository from their GitHub profile, which can then be edited and supplemented with new examples.
Creating fork of main repository...
Done!
Cloning into '/home/user/.xmpl/repos/xmpltest/xmpl-repo'...
remote: Enumerating objects: 937, done.
remote: Total 937 (delta 0), reused 0 (delta 0), pack-reused 937
Receiving objects: 100% (937/937), 144.19 KiB | 0 bytes/s, done.
Resolving deltas: 100% (349/349), done.
Checking connectivity... done.
A user who has already forked the Xmpl main repository on their GitHub account, doesn’t need to authorize the same fork again, so the Xmpl tool will automatically download the copy of the repository to the local machine.
To add a new custom repository, first create a new repository on your GitHub account as described on the GitHub site:
https://help.github.com/en/articles/creating-a-new-repository
After the repository has been created, you will have to create the commands.repo file in the repository with the arbitrary content. This file is necessary for using the repository with Xmpl tool.
Example of commands.repo file:
A custom repository can be added with the --new-repo or –n option, after which the GitHub username and the existing repository name must be entered in the following format:
Example: Adding a custom xmpl-custom repository from the GitHub user xmpltest
$: xmpl -n xmpltest/custom-xmpl
New repository from GitHub source 'xmpltest/custom-xmpl'
Enter GitHub username:
xmpltest
Enter local repository alias:
custom
Cloning into '/home/user/.xmpl/repos/xmpltest/custom-xmpl'...
remote: Enumerating objects: 3, done.
remote: Total 3 (delta 0), reused 0 (delta 0), pack-reused 3
Unpacking objects: 100% (3/3), done.
Checking connectivity... done.
The Xmpl tool expects a prepared repository. If the repository is not properly prepared this error message will be displayed:
Not valid Xmpl repository!
Or if the repository does not exist:
GitHub repository does not exist!
The quick-change repository option is designed for working with multiple repositories at the same machine.
With the --repo or -r option, it is possible to check or change the current working repository:
$: xmpl -r
Using 'main' repository!
1 apt-cache  The apt-cache command can display much of the information stored in APT's internal database
2 apt-get  Command-line tool for handling packages on Debian based distributions
3 cal  The cal utility displays a simple calendar in traditional format
...
If the correct local repository pseudonym is forwarded after the --repo or -r option, Xmpl tool will use the given repository for that request.
$: xmpl -r dev
Using 'dev' repository!
1 apt-cache  The apt-cache command can display much of the information stored in APT's internal database
2 apt-get  Command-line tool for handling packages on Debian based distributions
3 cal  The cal utility displays a simple calendar in traditional format
...
For a permanent change of repositories use the option --store-repo or -R.
If the Xmpl tool is invoked with this option, the default repository will be printed along with a list of all locally available repositories with their pseudonyms.
$: xmpl -R
Current repository: main (xmpl-tool/xmpl-repo)
main=xmpl-tool/xmpl-repo
dev=xmpltest/xmpl-repo
custom=xmpltest/custom-xmpl
If a locally installed pseudonym is forwarded after the --store-repo or -R option, the Xmpl tool will set the given repository as the new default repository.
$: xmpl -R custom
Using repository: custom (xmpltest/custom-xmpl)
After changing the default repository, all requests for which the repository is not specified, will be processed in a newly set repository.
$: xmpl
Empty repository!
As the custom repository is currently empty, the message “Empty repository!” is printed on the console.
Adding and editing new packages and examples can be done directly through the Xmpl tool on all private repositories, using the --edit or -e option.
While entering this option, you can instantly write the name of the package for which you want to add or edit an example. If the package name is not forwarded, the Xmpl tool will prompt the user to enter a package name for editing.
After the package is entered, the Xmpl tool will check if the package already exists in the repository. If the package does not exist, Xmpl tool will prompt the user to enter the new package description:
$: xmpl -e
Enter package name:
echo
Create new package 'echo'? [Y/n]
y
Please enter description for package 'echo':
The packet description is displayed next to the package name while the Xmpl tool is printing the packages and examples available for use.
Display a line of text
Is this description correct? [y/N]
y
Since this is a first example for the package echo, the procedure for adding a new example will be initiated and the user will be asked to enter the title of the new example:
Enter example title:
Print current working directory
Is this title correct? [y/N]
y
After entering the required data, the tool will ask for the content. The syntax of the example should be entered keeping the variable structure ({:single variable:} or {::variables list::}) in mind, placing the variables in adequate positions in the command syntax.
- {:single variable:}- variable content is literal (used for filenames, paths, …)
- {::variables list::}- variable content is delimited by space (used for listing parameters, multiple variables...)
Edit example 'Print current working directory'
Enter command with input variable structure {:normal input:} or {::list input::}
echo $PWD
Is this command correct? [y/N]
y
After entering the example, the tool will ask for related search terms which are used to find the example with the search system.
Both the title and the contents of the example are indexed for searching, meaning that the search tags are used to broaden this scope. There is no need to repeat title or content terms.
Edit search tags:
pwd dir show display print folder my location variable this
Is this correct? [y/N]
y
After the final confirmation, the example will be stored in the default local repository and printed on the screen.
Example 'Print current working directory' successfully modified!

#print current working directory
#pwd dir show display print folder my location variable this
echo $PWD
If a package exists, Xmpl tool will provide a list of examples that can be edited, as well as the option to add a new example into the repository.
You can add a new example by selecting the option 0 NEW, or edit an existing example by selecting its number from the provided example list.
$: xmpl -e echo
0  NEW
1  Print current working directory
Please select example number:
0
Enter example title:
Print my message on screen
Is this title correct? [y/N]
y
Edit example 'Print my message on screen'
Enter command with input variable structure {:normal input:} or {::list input::}
echo {:message:}
Is this command correct? [y/N]
y
Edit search tags:
write line of text
Is this correct? [y/N]
y
Example 'Print my message on screen' successfully modified!

#print my message on screen
#write line of text
echo {:message:}
The procedure for both editing an existing example or adding a new one is similar. The only difference is that existing content will be pre-filled.
If an example that contains multiple lines of code is edited, the Xmpl tool will edit an example in the default text editor (3.3.2.).
To add examples that contain multiple lines of code, use the --editor or -E option. It behaves in the same way as the option to edit the examples, except that a default text editor is always used for editing an examples command.
Example: Adding own scripts to a custom repository
To demonstrate this example, we will first set xmpltest/custom-xmpl as the default repository for the Xmpl tool:
$: xmpl -R custom
Using repository: custom (xmpltest/custom-xmpl)
In a custom repository, we'll add a new package called TEST:
$: xmpl -E TEST
Create new package 'TEST'? [Y/n]
y
Please enter description for package 'TEST':
my custom multiline script
Is this description correct? [y/N]
y
Enter example title:
change shell foreground color
Is this title correct? [y/N]
y
Edit example 'change shell foreground color'
Enter command with input variable structure {:normal input:} or {::list input::}
This will open multiline editor! OK?
After confirming the message, the default text editor will open, in this case nano:
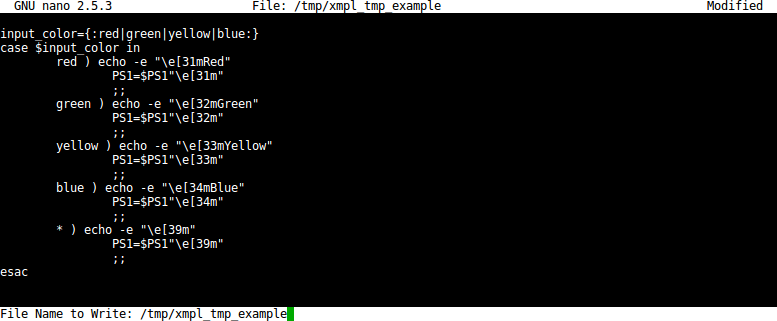
When the example is finally stored and the editor closed, editing will be continued.
input_color={:red|green|yellow|blue:}
case $input_color in
	red ) echo -e "\e[31mRed"
		PS1=$PS1"\e[31m"
		;;
	green ) echo -e "\e[32mGreen"
		PS1=$PS1"\e[32m"
		;;
	yellow ) echo -e "\e[33mYellow"
		PS1=$PS1"\e[33m"
		;;
	blue ) echo -e "\e[34mBlue"
		PS1=$PS1"\e[34m"
		;;
	* ) echo -e "\e[39m"
		PS1=$PS1"\e[39m"
		;;
esac
Is this command correct? [y/N]
y
Edit search tags:
bash terminal console font
Is this correct? [y/N]
y
Example 'change shell foreground color' successfully modified!

#change shell foreground color
#bash terminal console font
input_color={:red|green|yellow|blue:}
case $input_color in
	red ) echo -e "\e[31mRed"
		PS1=$PS1"\e[31m"
		;;
	green ) echo -e "\e[32mGreen"
		PS1=$PS1"\e[32m"
		;;
	yellow ) echo -e "\e[33mYellow"
		PS1=$PS1"\e[33m"
		;;
	blue ) echo -e "\e[34mBlue"
		PS1=$PS1"\e[34m"
		;;
	* ) echo -e "\e[39m"
		PS1=$PS1"\e[39m"
		;;
esac
If there is no default text editor on the system, the Xmpl tool will ask the user to enter a new default text editor (vi, nano, ...).
The default text editor can manually be defined in the ~/.xmpl/xmpl.conf file using the XMPL_DEFAULT_EDITOR variable.
To delete an existing example or package use the option --delete or –d. When this option is used, it is necessary to input the name of the package that you wish to delete.
In case there is at least one example, the Xmpl tool will print out all available examples for the selected package, and prompt the user to select the example they want to delete.
$: xmpl -d TEST
Select the example you want to delete!
1  change shell foreground color
Please select example number:
After selecting an example, the example content is printed once more and the user is prompted for confirmation.
1
#change shell foreground color
#bash terminal console font
input_color={:red|green|yellow|blue:}
case $input_color in
	red ) echo -e "\e[31mRed"
		PS1=$PS1"\e[31m"
		;;
	green ) echo -e "\e[32mGreen"
		PS1=$PS1"\e[32m"
		;;
	yellow ) echo -e "\e[33mYellow"
		PS1=$PS1"\e[33m"
		;;
	blue ) echo -e "\e[34mBlue"
		PS1=$PS1"\e[34m"
		;;
	* ) echo -e "\e[39m"
		PS1=$PS1"\e[39m"
		;;
esac
Delete example 'change shell foreground color'? [y/N]
y
Example 'change shell foreground color' successfully deleted!
If there is no example with the stated package, the user will be prompted to delete the package from the repository.
$: xmpl -d TEST
No examples for package 'TEST'!
Delete this package? [y/N]
y
Package 'TEST' successfully deleted!
Synchronization between local and GitHub repositories is also automated by using the --sync-repo or -S option.
If a local pseudonym is not forwarded after the --sync-repo option, the default repository will be used for synchronization.
It isn’t possible to directly edit any repositories located under the GitHub organization xmpl-tool. Only approved modifications and newly added examples are enabled for retrieval in such repositories.
In this case, the synchronization of the repository is one-way. (remote main>> local main)
$: xmpl –S main
Fetching origin
6 file/s changed!
commands/apt/Automatically clean apt cache on Debian based distributions.xmpl
commands/apt/Automatically clean apt cache.xmpl
commands/apt/Completely remove packages with configuration on Debian based distributions.xmpl
commands/apt/Completely remove packages with configuration.xmpl
commands/apt/Delete downloaded .deb packages from the local repository on Debian based distibutions.xmpl
commands/apt/Delete downloaded .deb packages from the local repository.xmpl
Do you want to synchronize 'main' repository? [Y/n]
Y
Updating 2fe9048..e93898f
Fast-forward
commands/apt/Automatically clean apt cache on Debian based distributions.xmpl
| 4 ++++
commands/apt/Automatically clean apt cache.xmpl
| 3 ---
commands/apt/Completely remove packages with configuration on Debian based distributions.xmpl
| 4 ++++
commands/apt/Completely remove packages with configuration.xmpl
| 3 ---
commands/apt/Delete downloaded .deb packages from the local repository on Debian based distibutions.xmpl
| 4 ++++
commands/apt/Delete downloaded .deb packages from the local repository.xmpl
| 3 ---
6 files changed, 12 insertions(+), 9 deletions(-)
create mode 100644 commands/apt/Automatically clean apt cache on Debian based distributions.xmpl
delete mode 100644 commands/apt/Automatically clean apt cache.xmpl
create mode 100644 commands/apt/Completely remove packages with configuration on Debian based distributions.xmpl
delete mode 100644 commands/apt/Completely remove packages with configuration.xmpl
create mode 100644 commands/apt/Delete downloaded .deb packages from the local repository on Debian based distibutions.xmpl
delete mode 100644 commands/apt/Delete downloaded .deb packages from the local repository.xmpl
Synchronization of the main repository is automated to run every day after the user forwards a request to the repository for the first time.
When synchronizing private repositories, all approved examples from the source repository will be downloaded while committing any local changes. All changes either locally added or downloaded from the source repository will be merged and then synchronized with the private GitHub repository on the user profile.
$: xmpl –S dev
Fetching origin
Fetching upstream
From https://github.com/xmpl-tool/xmpl-repo
* [new branch]
master
-> upstream/master
3 file/s changed!
commands/echo/Print current working directory.xmpl
commands/echo/Print my message on screen.xmpl
commands/echo/echo.desc
Do you want to synchronize 'dev' repository? [Y/n]
y
Already up-to-date.
Already up-to-date.
[master 179aa19] 3 file/s changed (echo)
commands/echo/Print current working directory.xmpl commands/echo/Print my message on screen.xmpl
commands/echo/echo.desc
3 files changed, 8 insertions(+)
create mode 100644 commands/echo/Print current working directory.xmpl
create mode 100644 commands/echo/Print my message on screen.xmpl
create mode 100644 commands/echo/echo.desc
Username for 'https://github.com': xmpltest
Password for 'https://xmpltest@github.com': ********
Counting objects: 7, done.
Delta compression using up to 2 threads.
Compressing objects: 100% (6/6), done.
Writing objects: 100% (7/7), 745 bytes | 0 bytes/s, done.
Total 7 (delta 1), reused 0 (delta 0)
remote: Resolving deltas: 100% (1/1), completed with 1 local object.
To https://github.com/xmpltest/xmpl-repo
2fe9048..179aa19 master -> master
The synchronization is in this case two-way, and needs to be authorized by the GitHub user whose repository is being edited. (remote main>> local private >> remote private)
By this step, all changes are only entered in private repository and they are not available to other users of Xmpl tool, unless they specifically add your private repository as a source of examples in the Xmpl tool.
The option --pull-request or -P is used to release all private changes to the Xmpl main repository.
If a local pseudonym is not forwarded after the --pull-request option, the tool will try to publish the last set default repository.
$: xmpl -p dev
This step before publication includes the synchronization of the private repository (3.4.2).
If you do not already have an open pull request, the Xmpl tool will try to publish all last changes you've made, prompting the user to enter the title and body of the new pull request.
Fetching origin
Fetching upstream
Repository up to date!
Enter pull request title:
simple echo examples
Enter pull request body:
simple echo examples
After briefly explaining newly-created examples or changes, the Xmpl tool will prompt the user to authorize the request with their GitHub password.
Enter host password for user 'xmpltest': **********
Pull request successfull!
Synchronization is currently performed between remote repositories (remote private >> remote main).
If a pull request already exists, all new changes will be supplemented on an already open request, until it is approved by an xmpl-tool organization member.
After one of the xmpl-tool organization members evaluates and approves the submitted changes, they will become available to all Xmpl users in the Xmpl main repository.
If the original (source) repository is owned by another user, they respond and approve all changes on his repository.
Deleting an existing local repository is possible by using the --remove-repo or -m option, appending a local pseudonym for a repository that the user wants to delete from the local machine.
$: xmpl -m custom
Delete local repository 'custom' (xmpltest/custom-xmpl)?  [y/N]
y
Deleting xmpltest/custom-xmpl
Repository 'custom' successfully deleted from local system!
Using repository: main (xmpl-tool/xmpl-repo)
Deleting a local repository refers only to local files. The deletion of the repository from the GitHub profile has to be done manually on the GitHub website:
To display the currently used version of the tool, use the --version or -v option after which the current version will be printed in the console:
$: xmpl -v
xmpl-tool 1.0.9
To print all the options available for use with Xmpl tool, use option --help or -h or -?.
Depending on whether Xmpl tool is installed on a computer or not, the available options will be printed.
No-install usage:

 xmpl
	filter_1 filter_2
	[--search] filter_1 filter_2
	[--package] package
	[--input] [--execute] [--execute-last] argument_1 argument_2
	[--comments] [--raw] [--online] [--full-online] [--last] [--install] [--version] [--help]


 xmpl 					List available packages

   [<query>]				Search all examples with query

   -s [<query>]		 --search	Search examples with query
   -p [package]		 --package	Filter by package

   -c			 --comments	Display comments in examples
   -C			 --raw		Display raw example

   -O 			 --full-online	Force online mode with descriptions

   -i [<arguments>]	 --input	Input mode
   -x [<arguments>]	 --execute	Execute mode

   -l			 --last		Show last selected example
   -X [<arguments>]	 --execute-last	Execute last selected example

   -I			 --install	Install on local system
   -v			 --version	Display version
   -? / -h		 --help		Show xmpl help page
Full usage:

 xmpl
	filter_1 filter_2
	[--search] filter_1 filter_2
	[--package] [--edit] [--editor] [--delete] package
	[--input] [--execute] [--execute-last] argument_1 argument_2
	[--new-repo] github_user/repo
	[--remove-repo] [--change-repo] [--save-repo]
	[--sync-repo] [--pull-request] repo_alias
	[--comments] [--raw] [--online] [--full-online] [--last]
	[--install] [--update] [--uninstall] [--version] [--help]


 xmpl 					List available packages

   [<query>]				Search all examples with query

   -s [<query>]		 --search	Search examples with query
   -p [package]		 --package	Filter by package

   -c			 --comments	Display comments in examples
   -C			 --raw		Display raw example

   -o 			 --online	Force online mode
   -O 			 --full-online	Force online mode with descriptions

   -i [<arguments>]	 --input	Input mode
   -x [<arguments>]	 --execute	Execute mode

   -l			 --last		Show last selected example
   -X [<arguments>]	 --execute-last	Execute last selected example

   -I			 --install	Install on local system
   -U			 --update	Update to latest version
   -D			 --uninstall	Uninstall from local system

   -n [github_user/repo] --new-repo	Add new private repository
   -m [repo_alias]	 --remove-repo	Delete local repository

   -r [repo_alias]	 --change-repo	Switch repository source
   -R [repo_alias]	 --save-repo	Switch and store repository source

   -e [package]		 --edit		Edit examples in private repository
   -E [package]		 --editor	Edit multiline examples in private repository
   -d [package]		 --delete	Delete example or package in private repository

   -S [repo_alias]	 --sync-repo	Synchronize local and remote repository
   -P [repo_alias]	 --pull-request	Send changes to xmpl main repository

   -v			 --version	Display version
   -? / -h		 --help		Show xmpl help page